背景知识
进程与线程
类似其他操作系统的相应概念,Android 的进程拥有独立的虚拟内存空间,而线程与同一进程内的其他线程共享内存,只拥有各自的栈空间、程序计数器和寄存器等少量独占资源。
当 Android 启动一个之前未运行的应用的组件时,会为其启动一个包含单个主线程"main"的新的 Linux 进程。默认情况下,同一应用的所有组件会在此进程内启动,并且使用同一执行线程。
开发者可以人为安排组件在单独的进程中运行,并且为进程创建额外的线程。
Android 线程
每个 Android 应用都有一个主线程,也称界面线程,负责绘制 UI,处理用户交互以及接收生命周期事件。Android UI 操作不是线程安全的,这些操作必须在主线程执行。
为了不拖慢主线程,任何长时间运行的计算和操作都应在后台线程完成,避免 ANR。使用多线程还可以充分利用多核处理器的优势,通过并行提高运行速度。
- 创建线程的方法
- Java 的线程方法
- 重载 Thread.run() 方法
- 实现 Runnable 类
- Android 的线程方法
- AsyncTask
- IntentService
- HandlerThread
- Executors 中创建线程池 (
newFixedThreadPool,newScheduledThreadPool,newWorkStealingPool)
- Java 的线程方法
从其他线程访问主线程的方法
Activity.runOnUiThread(Runnable)View.post(Runnable)View.postDelayed(Runnable, long)- 使用 Handler
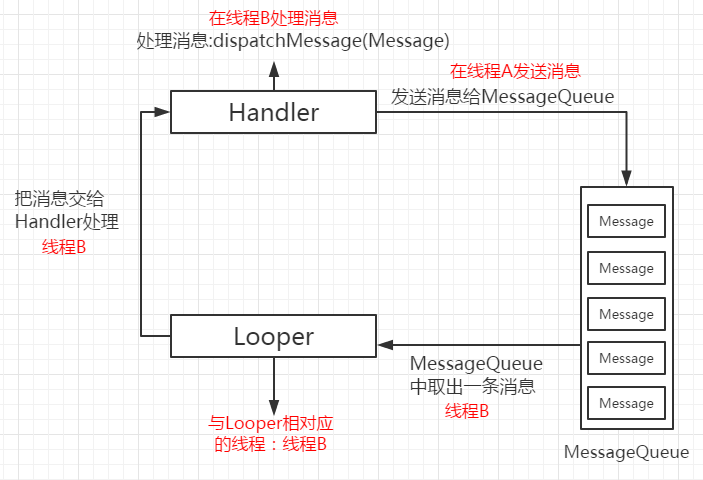
Handler 介绍
Handler 是 Android 系统线程管理框架的一部分,使用消息队列实现线程之间的通信。
Handler 允许你发送和处理关联到线程的 MessageQueue 的 Message 和 Runnable 对象。新的 Handler 会绑定到创建者线程的消息队列上。
消息驱动机制的四要素:
- 接收消息的“消息队列”:
MessageQueue - 阻塞式地从消息队列中接收消息并进行处理的“线程”:
Thread&Looper - 可发送的“消息的格式”:
Message - “消息发送函数”:
Handler.post(Runnable)&Handler.sendMessage(Message)
Handler 的两大主要作用:
- 安排
Message和Runnable在未来某个时刻运行。 - 安排在其他线程中执行的动作。
使用 Handler:
-
接收者线程:
- 如果是子线程,判断其是否已有
Looper,如果没有,运行Looper.prepare() - 实例化 Handler 对象
mHandler,实现handleMessage方法(重载方法或实现Callback接口)。 - 如果接收者是子线程,调用
Looper.loop()方法,使得 Looper 调用handleMessage方法对消息进行处理;如果是主线程,启动时已经调用了Looper.prepare()Looper.loop()方法。 - 如果子线程不需要再处理消息,调用
Looper.myLooper().quit()退出消息轮询
- 如果是子线程,判断其是否已有
-
发送者线程:
- 创建 Message 对象,设置 Message 的参数
- 使用
mHandler.sendMessage(Message)方法将 Message 传入 Handler 的消息队列
Handler 常用方法:post(Runnable), postAtTime(Runnable, long), postDelayed(Runnable, Object, long), sendEmptyMessage(int), sendMessage(Message), sendMessageAtTime(Message, long), sendMessageDelayed(Message, long)
Looper 介绍
Looper 负责处理 MessageQueue 中的 Message。
一个线程内最多只有一个 Looper 对象,否则会抛出异常。
使用 Looper:
1. 判定是否已有 Looper 并 Looper.prepare()
2. 做一些准备工作
3. 调用Looper.loop(),线程进入阻塞态
Handler 源码分析

Handler
frameworks/base/core/java/android/os/Handler.java
重要成员变量:
1 |
|
构造方法
1 | public Handler( Callback callback, boolean async) { |
第一种构造方法首先获取当前线程的 Looper。如果当前线程没有初始化 Looper,则会抛出异常。第二种构造方法直接传入要使用的 Looper 作为参数。之后初始化 mCallback 和 mAsynchronous 成员。
其他方法
post 系列方法会调用 getPostMessage 方法将 Runnable 包装为 Message,然后使用 sendMessage 系列方法发送。
sendMessage 系列方法最终会调用 enqueueMessage 私有方法,最后调用 MessageQueue.enqueueMessage 方法加入消息队列。
removeMessages 和 removeCallbacks 系列方法会调用 MessageQueue.removeMessages 方法从消息队列中移除指定消息。
obtainMessage 系列方法会调用 Message.obtian 系列方法,从消息池中获取一个 Message 对象。
1 | private static Message getPostMessage(Runnable r) { |
getPostMessage 方法将 Runnable 对象赋值给 Message 对象的 callback 成员变量,从而将其包装为 Message。
1 | public void dispatchMessage( Message msg) { |
dispatchMessage 方法处理消息的方式有三种:
- 先检查 Message 对象的
callback是否非空,若是,表明这个 Message 是使用post方法发送的,运行该 Runnable。 - 否则,检查是否初始化了
mCallback成员变量,若是,运行其中的handleMessage方法。mCallback 成员变量可以在调用 Handler 构造方法时传入 Callback 接口的实现来初始化。 - 如果没有实现 Callback 接口,或上一步方法返回值为
true,则运行 Handler 本身的handleMessage方法。
getMain 方法会返回静态成员变量 MAIN_THREAD_HANDLER 的值。如果该变量没有初始化,就创建一个使用主线程 Looper 对象初始化的 Handler 对象,对该变量赋值并返回。
createAsync 系列方法调用 Handler 对应构造方法,其中async=true
runWithScissors TODO
getIMessenger TODO
Looper
frameworks/base/core/java/android/os/Looper.java
1 | public final class Looper { |
构造方法
1 | private Looper(boolean quitAllowed) { |
构造方法是私有方法,只能通过 Looper.prepare() 来初始化 Looper。
接下来就看看Looper.prepare():
1 | public static void prepare() { |
首先尝试获取静态线程局部变量 sThreadLocal,如果不为空,就说明已经创建过 Looper 对象,抛出RuntimeException;否则,就将 sThreadLocal 的值设置为新创建的 Looper 对象。
同一线程内的所有对象共享同一个静态变量 sThreadLocal,因此能保证一个线程至多只有一个 Looper 对象。
启动主线程相关代码:
frameworks/base/core/java/android/app/ActiviytThead.java
1 | public static void main(String[] args) { |
1 | public static void prepareMainLooper() { |
主线程启动时调用 PrepareMainLooper() 方法。这个方法会调用 prepare(quitAllowed) 方法,其中 quitAllow=False,之后将 sMainLooper 赋值为自身的 Looper。其他线程可以使用 Looper.getMainLooper() 方法来访问主线程的 Looper。
实例化 Looper 之后,创建 ActivityThread 实例,将线程注册到系统服务,最后调用 Looper.loop() 进入消息处理循环。
至此,应用程序的启动过程就完成了。正常情况下主线程会一直处于消息循环中,这样应用程序组件就可以利用消息处理机制来实现业务逻辑。
消息循环
看看Looper.loop()怎样进行消息处理循环:
1 | public static void loop() { |
loop() 方法会进入一个死循环,不断从 MessageQueue 取出消息,交给 Handler 处理。
如果消息队列为空,queue.next() 方法会阻塞,直到有消息进来,再取出消息返回。除非调用quit() 或 quitSafely() 方法结束轮询,queue.next() 才会返回null,结束循环。
MessageQueue
frameworks/base/core/java/android/os/MessageQueue.java
frameworks/base/core/jni/android_os_MessageQueue.cpp
构造方法
1 | MessageQueue(boolean quitAllowed) { |
可以看出主要工作在 nativeInit()函数进行,这是一个 JNI 方法,在讨论线程阻塞与唤醒时再回到这里。
插入与移除消息
消息队列以链表的方式储存,MessageQueue 的 mMessages 成员变量保存链表的第一个消息。
enqueueMessage 方法插入消息到队列,removeMessages 方法移除消息。插入和移除消息时会保证消息队列总是按 when 属性递增的顺序排列,也就是链表的头总是最紧急要处理的消息。
1 | boolean enqueueMessage(Message msg, long when) { |
mBlocked = true 时,以下几种情况下,插入消息会设置 needWake = true,唤醒接收者线程:
- 消息队列为空(
p == null) - 消息设置为立即处理(
when == 0) - 消息预定的时刻早于队列头部的消息(
when < p.when) - 消息队列被同步屏障暂停,而插入的消息是最早一条要处理的异步消息
如果需要唤醒,会调用 nativeWake(mPtr) 方法唤醒线程。我们待会讨论这个方法。
插入与移除同步屏障
postSyncBarrier 方法会插入一条同步屏障(Sync Barrier)消息到消息队列。next 方法读取到同步屏障消息后,会停止处理同步消息,只处理异步消息。如果不设置生效时间或设置为 0,屏障将立即生效。该方法返回一个 token,用于调用 removeSyncBarrier 方法移除该同步屏障。
removeSyncBarrier 方法会移除插入的同步屏障消息,使消息队列继续处理同步消息。
取下一条消息
MessageQueue.next() 方法将下一条待处理的消息返回给 Looper。其内部实现了阻塞线程、同步屏障、定时处理消息、处理空闲情况等机制。没有消息时,该方法会阻塞线程,直到新的消息到达,或者定时器到期。
1 | Message next() { |
首先获取 NativeMessageQueue 对象的指针。如果该指针为空,说明 Native 对象没有正确初始化,返回 null 结束消息循环。
接下来进入取待处理消息的循环。
若下次查询的超时时间不为0,Binder.flushPendingCommands();(?)
调用 JNI 方法 nativePollOnce,这个方法就是没有消息时阻塞的源头,先放在一边。
接着看下面的过程,仍在 for 循环内:
1 | synchronized (this) { |
mMessages 成员变量作为链表头,是这一轮循环搜索消息的起始点,临时变量msg 保存要取出的消息。
-
第 6 到 12 行,如果
msg.target为空,说明这是一个由postSyncBarrier方法设置的同步屏障(Sync Barrier)消息,那么快进msg到下一个异步消息。 -
接下来,如果
msg不为空,首先判断消息的唤醒时间是否已到,没有到就设置下次唤醒时间为该唤醒时间。否则,从消息队列链表中取出msg:
- 如果之前有快进过(
prevMsg != null),prevMsg指向下一个消息。 - 否则,
mMessages向前移动。
最后返回当前消息 msg。
如果上一步判断当前消息为空,设置 nextPollTimeoutMillis = -1, 执行nativePollOnce 方法时将一直阻塞,直到有新的消息到达。
-
36 到 39 行,如果
mQuitting变量设置为true, 现在就是处理退出请求的时候:扔掉剩余请求,并返回 null。 -
44 行开始,就是处理 IdleHandler 的代码。如果第一次遇到空闲(没有消息要处理)的情况,初始化
pendingIdleHandlerCount计数。 -
接下来,如果没有 IdleHandler 需要运行,设置
mBlocked = true,这会通知enqueueMessage方法在加入消息时唤醒当前线程。
这一节的最后,如果之前没有初始化mPendingIdleHandlers,执行初始化。
离开临界区,继续处理 IdleHandlerr:
1 | for (int i = 0; i < pendingIdleHandlerCount; i++) { |
遍历要处理的 IdleHandler,执行其 queueIdle() 方法。如果该方法返回 false,表明整个消息循环中该方法只需执行一次,就从 mIdleHandlers 中移除对应的 IdleHandler。
最后重设 pendingIdleHandlerCount 计数为 0,这样下个循环就不会再次处理 IdleHandler 相关逻辑。
总结一下整个方法的行为:

线程阻塞与唤醒
初始化 NativeMessageQueue
前面 MessageQueue 初始化时,调用 nativeInit() 初始化其 C++ 对象:
1 | static jlong android_os_MessageQueue_nativeInit(JNIEnv* env, jclass clazz) { |
新建了 NativeMessageQueue 对象并增加其强引用计数,返回对象指针。
1 | NativeMessageQueue::NativeMessageQueue() : |
构造方法尝试获取当前线程的 C++ 层 Looper 对象,如果没有获取到,则新建一个并绑定到当前线程。
来看看这个 C++ 层的 Looper:
system/core/libutils/include/utils/Looper.h、
system/core/libutils/Looper.cpp
1 | Looper::Looper(bool allowNonCallbacks) |
构造方法使用 eventFd 系统调用获取了 mWakeEventFd,作为后续 epoll 用于唤醒的文件描述符。
有了 Fd,再进入 rebuildEpollLocked() 调用:
1 | void Looper::rebuildEpollLocked() { |
在第 6 行,通过系统调用 epoll_create1 初始化一个 epoll 实例,之后创建 epoll_event 结构 eventItem 并设置 events 属性,将 fd 设置为之前创建的 mWakeEventFd。
在第 13 行,通过系统调用 epoll_ctl 将 eventItem 注册到 epoll。
epoll 允许我们对多个文件描述符进行监听。注册监听的 fd 之后,调用 epoll_wait 函数,当 fd 指向的对象数据可用时,epoll_wait 函数就会返回,同时从传入的events指针返回发生改变的 fd 对应的 eventItem。
阻塞
前面说过如果消息队列没有消息,线程就会被阻塞。阻塞的调用路径是 Looper.loop() -> MessageQueue.next() -> MessageQueue.nativePollOnce(long , int)。我们从 nativePollOnce 开始继续追踪。
JNI 方法 nativePollOnce 调用 NativeMessageQueue::pollOnce 方法,进一步调用 Looper::pollOnce 方法。
1 | int Looper::pollOnce(int timeoutMillis, int* outFd, int* outEvents, void** outData) { |
最后来到 pollInner:
1 | int Looper::pollInner(int timeoutMillis) { |
第4行就是关键所在。通过执行系统调用 epoll_wait ,线程将会阻塞,直到注册的 fd 有新数据或者到达超时时间才会返回。前面 MessageQueue 初始化时注册了 mWakeEventFd ,当它有新数据时 epoll_wait 就会返回,解除阻塞。由此推测,唤醒线程的方法 nativeWake 正是通过向 mWakeEventFd 写数据的操作,来解除阻塞,实现其功能的。这里写入的数据并不重要,只是利用 epoll 机制提供的阻塞和唤醒功能。
解除阻塞后,接下来进入事件处理的过程。遍历返回的 eventItems,检查是否有 fd 与 mWakeEventFd 相同。如果有,执行 awoken 方法。该方法不断读取 mWakeEventFd 以清空其内容,便于下次使用。
这里省略了大量与处理 Native 层消息相关的代码,因为这与本次主题无关。
唤醒
nativeWake 用于唤醒功能,调用 NativeMessageQueue::wake(),进一步调用 Looper::wake()。正如之前预测的,该方法向 mWakeEventFd 写入数据,实现其唤醒的功能。
调用链


Q&A
Q: Looper 如何保证线程唯一的?
A: Looper 的构造方法是私有的,只能通过 Looper.prepare() 创建,通过 Looper.myLooper() 获取。
Looper.prepare() 会检查静态线程局部变量 sThreadLocal 的值是否已设定,只有未设定时才会将其设为新建的Looper 对象,否则抛出异常。同一线程内的所有对象共享同一个静态变量sThreadLocal ,因此能保证一个线程至多只有一个 Looper 对象。
Q: ThreadLocal如何实现数据隔离的?与加锁实现的区别是什么?
A: 每个 Thread 对象中保存一个 ThreadLocalMap 对象,由 ThreadLocal 中的方法操纵。这个 Map 的 key 是 ThreadLocal 的弱引用,value 就是储存的对象。
当调用 ThreadLocal.get() 方法时,先判断该 ThreadLocalMap 是否非空,再使用 ThreadLocal 对象作为 key 查询并返回储存的对象。查询用的 hash code 是在ThreadLocal 对象初始化时调用 threadLocalHashCode 生成的。若 ThreadLocalMap 为null,或没有与 key 对应的对象,则调用 setInitialValue() 设初值并返回该值。
ThreadLocal 和 synchonized 都用于解决多线程并发访问,但是 ThreadLocal 与 synchronized 有本质的区别。
- 机制不同
- synchronized 是利用锁的机制,使变量或代码块在某一时该只能被一个线程访问。
- ThreadLocal 为每一个线程都提供了变量的副本,使得每个线程在某一时间访问到的并不是同一个对象。
- 数据共享状态不同
- synchronized 仅提供一份数据,使得多个线程间通信时能够获得数据共享。
- ThreadLocal 为每个线程提供一份数据,隔离了多个线程对数据的数据共享。
Q: 想在消息队列阻塞前处理一个事件应该如何实现?
A: 调用 next 方法取下一条消息时,消息队列会在当前消息为空时阻塞,以等待新的消息。通过 addIdleHandler 方法,添加处理空闲状态的代码,可以在下次循环到 nativePollOnce 阻塞之前执行期望的操作。
Q: 主线程与其他线程的不同之处有哪些?
A: 主线程在应用启动时由 Android 系统启动,子线程由应用开发者主动开启。主线程会在启动时调用 Looper.prepareMainLooper() 和 Looper.loop() 方法,进入消息循环。主线程进入 Looper.loop() 方法后不会退出消息循环,子线程可以通过 Looper.quit() 退出消息循环。主线程负责处理 UI 事件和 Broadcast 消息,若超时未响应会触发 ANR。
Q: Message 和 Runnable 在 Handler 中什么区别?
A: 逻辑是一样的,post 方法中的 Runnable 会被封装成 Message,再用 SendMessage 方法发送。
Q: Handler 如何实现消息定时处理?
A: 这一功能是在 MessageQueue.next() 方法实现的。MessageQueue 取出消息返回前,会对比该消息的 when 属性与当前时间。如果还没有到设定的时刻,就会设置nextPollTimeoutMillis变量,使得线程在给定的时刻唤醒。否则,就会返回该消息到 Looper,Looper 再调用 dispatchMessage 交给 Handler 处理。
参考文献
- Android SDK, android.os.Handler
- Android Developers Documentation, https://developer.android.com/reference/android/os/Handler
- Android 源码分析 --Handler 机制的实现与工作原理,https://juejin.im/post/5910522f1b69e6006858b830
- Android 消息机制(一)消息队列的创建与循环的开始 Looper与MessageQueue, https://www.viseator.com/2017/10/22/android_event_1/
- Android Handler的使用方式和注意事项, https://juejin.im/post/5910533dac502e006cfe01cd
- 理解 Java 中的 ThreadLocal, https://droidyue.com/blog/2016/03/13/learning-threadlocal-in-java/